Continuing our coverage of the latest innovations in reporting tools and dashboards, the next feature we will discuss is the Watermark style in version 2023.2.
A watermark can be an effective way to protect a document or indicate its ownership by a particular company or department. Our products have long offered the ability to apply watermarks to reports and dashboards, with several different options available for creating them.
Similarly, in dashboards, the Watermark property enables the use of text, images, weaves, or a combination of these elements to create a distinctive watermark.
However, the Watermark style solves this issue by allowing users to customize the style once and apply it to future report template pages and dashboards.
Furthermore, in dashboards, the watermark style can be applied to the Panel element.
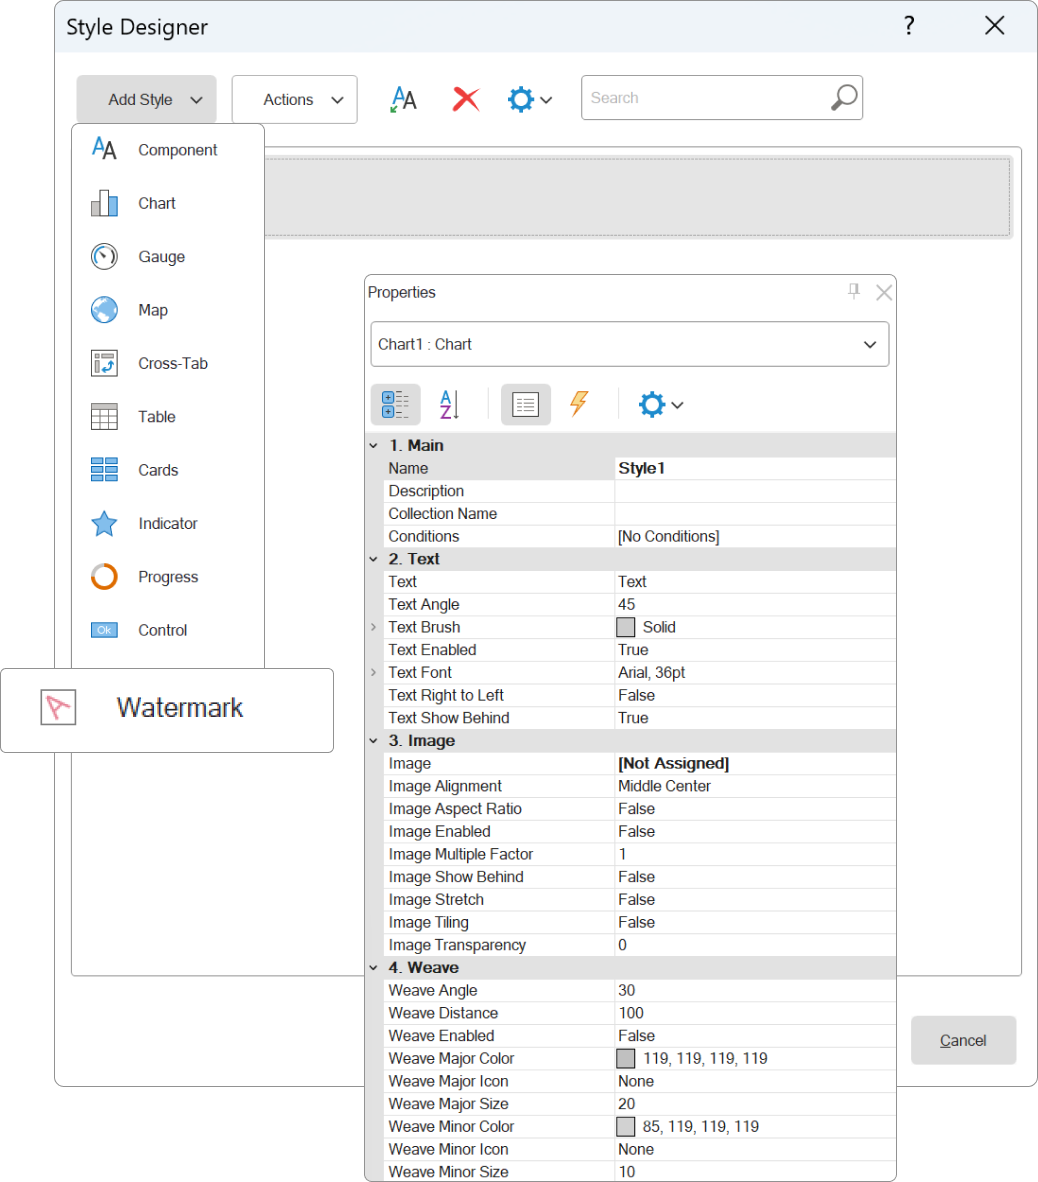
Select "Watermark" from the Add Style menu in the style editor. Then, adjust the various properties to configure the watermark. Finally, click the OK button to complete the style creation process. The new style is now ready to be applied to reports and dashboards.
In other words, select the template page, dashboard, or Panel element in the report designer, and then select the style as the value in the Watermark Style property.
The second important point to consider is that, as a separate style, the Watermark style has access to all the features and functions of styles. This means that the Watermark style can be saved to a *.sts file from the style editor and loaded into another template via the style editor.
It is also possible to apply the Watermark style to some pages in a template while manually determining the watermark settings for others using the available properties.
A watermark can be an effective way to protect a document or indicate its ownership by a particular company or department. Our products have long offered the ability to apply watermarks to reports and dashboards, with several different options available for creating them.
How was it before?
Report templates and dashboards both allow for the creation of unique watermarks using the Watermark property. In report templates, text, images, or combinations of both can be used to create a watermark, and a special Overlay band can be utilized to create it.Similarly, in dashboards, the Watermark property enables the use of text, images, weaves, or a combination of these elements to create a distinctive watermark.
What is a Watermark style?
The Watermark style is a collection of watermark settings, including text, images, and weaves, presented as a single style. By applying this style to reports or dashboards, the watermark properties will be automatically determined based on the style settings.Why do I use it?
Previously, when creating reports and dashboards with watermarks, it was necessary to define watermark settings for each individual template page or dashboard.However, the Watermark style solves this issue by allowing users to customize the style once and apply it to future report template pages and dashboards.
Furthermore, in dashboards, the watermark style can be applied to the Panel element.
Creating a Watermark style
To create a Watermark style, the style editor should be used. There are several ways to access the style editor, but the simplest method is to click the Style Editor button located on the Home tab of the report designer.Select "Watermark" from the Add Style menu in the style editor. Then, adjust the various properties to configure the watermark. Finally, click the OK button to complete the style creation process. The new style is now ready to be applied to reports and dashboards.
Applying a style
As already noted, the style can be applied to report template pages or analytical panels, as well as to the Panel element on the dashboard. The style is assigned using the Watermark Style property.In other words, select the template page, dashboard, or Panel element in the report designer, and then select the style as the value in the Watermark Style property.
Something you should know
It's important to note that when assigning a Watermark style to an object, only the settings available on that object will be used to create the watermark. For instance, even though a Watermark style may have a setting for weaves, they will not be applied to pages of the report template because the use of weaves is not currently available for report pages.The second important point to consider is that, as a separate style, the Watermark style has access to all the features and functions of styles. This means that the Watermark style can be saved to a *.sts file from the style editor and loaded into another template via the style editor.
It is also possible to apply the Watermark style to some pages in a template while manually determining the watermark settings for others using the available properties.
Summary
The Watermark style significantly simplifies the process of adding a watermark to reports and dashboards. It reduces the risk of errors during creation and adds flexibility when changing the watermark's concept. Editing the style once is all that is required, rather than having to edit every page in a report or dashboard template.If you have any questions, please do not hesitate to contact us.