The main problems when reading reports are information overload pages, text is plain and blurred. This leads to the fact that you cannot focus on the information that is important. One of the ways to solve this is to remove the background information. However, it is not always appropriate to do because background information can carry the load indirectly. For example, the background information may include company contact details, titles, and additional notes. Therefore, the deleting such information is an extreme case.
In order to make the report look good and presentable, separate important information from irrelevant, it is recommended to apply the graphic elements and colors in reports. For example, change font color, the background fill of components, including borders, etc. All these elements establish the style of the report. The picture below shows the report page without styles and with applied styles.


In all Stimulsoft products there is a built-in tool for creating styles. This tool is called the Style Designer. In order to call the Style Designer you should click the icon in the Report Designer on the Home tab. The picture below shows the Style Designer.
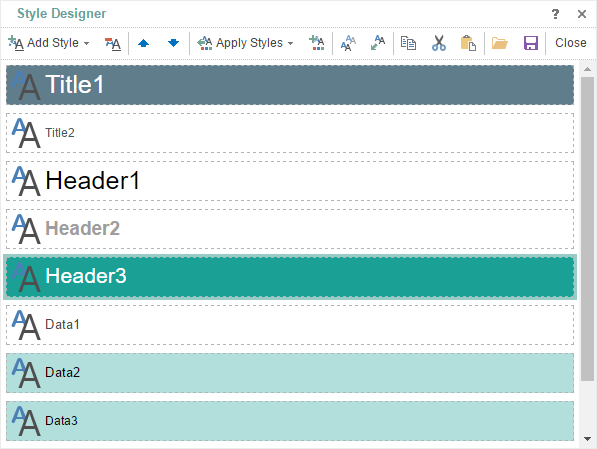
As can be seen from the picture, the Style Designer consists of a toolbar and a list of styles. From the list of styles, you can create a collection of styles. For this you should set a style in the Collection property and specify the name of a collection of styles. The collection of styles can be created once and applied to various reports. At the same time, the created collection of styles, as each style separately, can be edited when needed.
Before you start creating styles, take a look at the Style Designer toolbar.

 The Add Style menu contains a list of report items for which you can create styles. See the picture below.

Some items in this menu can be absent. For example, Reports.Web does not support Report Control.
 The button to remove the selected style from the list of styles.
 The buttons to move up and down in the selected style in the list.
 The Apply Styles button contains the dropdown list with the names of collections of styles. When you select a collection, it will be applied to the report.
 The button to add a style collection. There is no need to create a style manually. It is enough to define the basic color, select the report items to which to create a style, determine the level of the hierarchy in the report and click OK. The collection of styles will be generated automatically.
 The button to create a duplicate of the selected style. The duplicate will be placed below its prototype in the list of styles.
 The button is used to copy the style of the component. Select the component which style should be added to the collection of styles. Call the Style Designer without removing the selection of this component. Click this button. The style of the selected component will be added to the list of styles.
 The clipboard management commands. copy the selected style to the clipboard, cut to the clipboard, and paste the style from the clipboard.
 The Open button. Used to open the collection of styles.
 The Save button. Specify the location where the file will be saved and type the file name.
 The Close button. Closes the Style Designer.
Now create a style for the component.
- To do this, call the Style Designer, by clicking the button on the Home tab in the report designer;
- Click Add style and select items in the designer of styles. In this example, it is the Component.
The new style will appear in the Toolbox.

Using the properties of the item for which you create the style, you must define the appearance settings. Since styles can be created for various elements of the report, the properties of the design will be different. For example, the style for the chart has properties such as the area color, series color, etc. In this example, let’s create a report style for the report component (band, text component and other elements that can be found the Components group). The following settings are defined using the component properties.
- Fill color;
- Font color, face and size;
- Borders type and color.
Once the style is created, it should be applied to an element of the report. This can be done in the following ways.
- Select the report element and assign a style using the Style property of the component or the Style menu.
- In the Style Designer, click Apply Style collection.
If you click Apply Collection, then the following should be specified for the style.
- The name of the collection to which it belongs. It can be set using the Name property of the style;
- The condition of applying the style indicates when the collection of styles contains more than one item or the style should be applied only to specified report items.
Conditions of applying the style is set using the editor. To call this editor you should select the style in the Style Designer and click the button of the Condition property. Here is the Conditions editor.

As can be seen from the picture, the style conditions the style can be defined according to various criteria.
The condition by Placement. This type of conditions provides the opportunity to apply a style to a component, depending on its placement. In the values field containers (bands, panel, table, page) are selected. If to select operation is equal to, then the style will be applied to the components placed on the containers, which are selected in the value field. If you select the operation not equal to, then the style will be applied to the components placed in any container other than the selected value in the field. It should also be noted that in the value field, you can choose several containers.
- equal to The style will be applied when the nesting level of containers will be equal to the specified level in the field of values;
- not equal to. The style will be applied to all components in containers, which the nesting levels will not be equal to the specified level in the field of values;
- greater than. The style is applied to the components in containers, which nesting level is greater than the level of the specified field of values;
- greater than or equal to. The style is applied to the components in containers, which the nesting level is equal to or greater than the specified level in the field of values;
- less than. The style will be applied to components in containers, which nesting level is less than the specified level in the field of values;
- less than or equal to. The style is applied to the components in containers, which nesting level will be equal to or less than the specified level in the value field.
The condition by Component. This kind of is condition is set when it is necessary to apply (depending on the type of operation - equal or not equal) a style for the components of a specific type.
The condition by Location. This type of condition provides the ability to apply or not apply, depending on its position in the container. It should also be noted that the values in the field can choose multiple locations simultaneously.
By the name of a component. This condition type provides the ability to apply the style by name or a part of it. For example, if you set the Contains operation, and specify Text in the field of values, the style will be applied to all components in the name that has a Text. Suppose, Text24, 1Text, Text_on etc. When using this type of conditions, the following types of operations avaliable.
- equal to. The style is applied to a component with a name identical to the specified one in the value field.
- not equal to. The style is applied to all components, which name matches the specified field of values.
- containing. The style will be applied to all components which contain the name of the specified field values in their name.
- not containing. The style will be applied to all components, which in its name do not contain the name of the specified field of values.
- beginning with. The style will be applied to all components for which the name starts with the name specified in the value field.
- ending with. The style will be applied to all components for which the name ends with the name specified in the value field.
Also, it is possible to combine different types of conditions. In this case, the style will be applied, if all the conditions will work. In other words, if the conditions of Placement and Name of components are used, the style will be applied only when these conditions are processed. In addition, it is possible to use multi-conditions, when two or more blocks of conditions are involved. In this case, the component styles are applied only if all kinds of conditions in all the blocks will be executed. Execution of conditions starts after you click Apply Styles.
After the style is created and all its settings are defined, you should click the Save button on the toolbar in the Style Designer. Specify the path for the file with styles and name it. Once the style is created and applied is reports, you thereby emphasizing the corporate identity of your company. At the same time, in order to change the style of your reports, you just need to edit only the necessary styles.


Also, watch our video tutorials on working with designer styles.
Creating styles for charts
Using the Copy Style tool
Using borders in a report
Creating a report and styles
In order to make the report look good and presentable, separate important information from irrelevant, it is recommended to apply the graphic elements and colors in reports. For example, change font color, the background fill of components, including borders, etc. All these elements establish the style of the report. The picture below shows the report page without styles and with applied styles.
In all Stimulsoft products there is a built-in tool for creating styles. This tool is called the Style Designer. In order to call the Style Designer you should click the icon in the Report Designer on the Home tab. The picture below shows the Style Designer.
As can be seen from the picture, the Style Designer consists of a toolbar and a list of styles. From the list of styles, you can create a collection of styles. For this you should set a style in the Collection property and specify the name of a collection of styles. The collection of styles can be created once and applied to various reports. At the same time, the created collection of styles, as each style separately, can be edited when needed.
Before you start creating styles, take a look at the Style Designer toolbar.
Some items in this menu can be absent. For example, Reports.Web does not support Report Control.
Now create a style for the component.
- To do this, call the Style Designer, by clicking the button on the Home tab in the report designer;
- Click Add style and select items in the designer of styles. In this example, it is the Component.
The new style will appear in the Toolbox.
Using the properties of the item for which you create the style, you must define the appearance settings. Since styles can be created for various elements of the report, the properties of the design will be different. For example, the style for the chart has properties such as the area color, series color, etc. In this example, let’s create a report style for the report component (band, text component and other elements that can be found the Components group). The following settings are defined using the component properties.
- Fill color;
- Font color, face and size;
- Borders type and color.
Once the style is created, it should be applied to an element of the report. This can be done in the following ways.
- Select the report element and assign a style using the Style property of the component or the Style menu.
- In the Style Designer, click Apply Style collection.
If you click Apply Collection, then the following should be specified for the style.
- The name of the collection to which it belongs. It can be set using the Name property of the style;
- The condition of applying the style indicates when the collection of styles contains more than one item or the style should be applied only to specified report items.
Conditions of applying the style is set using the editor. To call this editor you should select the style in the Style Designer and click the button
As can be seen from the picture, the style conditions the style can be defined according to various criteria.
- equal to The style will be applied when the nesting level of containers will be equal to the specified level in the field of values;
- not equal to. The style will be applied to all components in containers, which the nesting levels will not be equal to the specified level in the field of values;
- greater than. The style is applied to the components in containers, which nesting level is greater than the level of the specified field of values;
- greater than or equal to. The style is applied to the components in containers, which the nesting level is equal to or greater than the specified level in the field of values;
- less than. The style will be applied to components in containers, which nesting level is less than the specified level in the field of values;
- less than or equal to. The style is applied to the components in containers, which nesting level will be equal to or less than the specified level in the value field.
The condition by Component. This kind of is condition is set when it is necessary to apply (depending on the type of operation - equal or not equal) a style for the components of a specific type. The condition by Location. This type of condition provides the ability to apply or not apply, depending on its position in the container. It should also be noted that the values in the field can choose multiple locations simultaneously. By the name of a component. This condition type provides the ability to apply the style by name or a part of it. For example, if you set the Contains operation, and specify Text in the field of values, the style will be applied to all components in the name that has a Text. Suppose, Text24, 1Text, Text_on etc. When using this type of conditions, the following types of operations avaliable.- equal to. The style is applied to a component with a name identical to the specified one in the value field.
- not equal to. The style is applied to all components, which name matches the specified field of values.
- containing. The style will be applied to all components which contain the name of the specified field values in their name.
- not containing. The style will be applied to all components, which in its name do not contain the name of the specified field of values.
- beginning with. The style will be applied to all components for which the name starts with the name specified in the value field.
- ending with. The style will be applied to all components for which the name ends with the name specified in the value field.
Also, it is possible to combine different types of conditions. In this case, the style will be applied, if all the conditions will work. In other words, if the conditions of Placement and Name of components are used, the style will be applied only when these conditions are processed. In addition, it is possible to use multi-conditions, when two or more blocks of conditions are involved. In this case, the component styles are applied only if all kinds of conditions in all the blocks will be executed. Execution of conditions starts after you click Apply Styles.
After the style is created and all its settings are defined, you should click the Save button on the toolbar in the Style Designer. Specify the path for the file with styles and name it. Once the style is created and applied is reports, you thereby emphasizing the corporate identity of your company. At the same time, in order to change the style of your reports, you just need to edit only the necessary styles.
Also, watch our video tutorials on working with designer styles.
Creating styles for charts
Using the Copy Style tool
Using borders in a report
Creating a report and styles