FAQ
Stimulsoft Reports.Java1. How to install Stimulsoft Reports.Java?
2. How to Create a Web Project?
3. How to Target a Runtime?
4. How Do I Create a Sample Page?
5. How Do I Create a Sample Page With the Report Designer?
6. Do You Have a Description of Custom Tags?
7. How Do I Override Methods for Loading and Saving?
8. How to Use SWT (Standard Widget Toolkit) Components?
1. How to install Stimulsoft Reports.Java?
1. Download and install Java™ SE version 1.7 or higher.2. Download and install EclipsePlatform.
3. Download an archive with jar files from Downloads page.
2. How to Create a Web Project?
Launch the Eclipse IDE, choose File > New > Project. In the project wizards open the Web type and in the drop-down list select Dynamic Web Project wizard and click Next (Figure 1).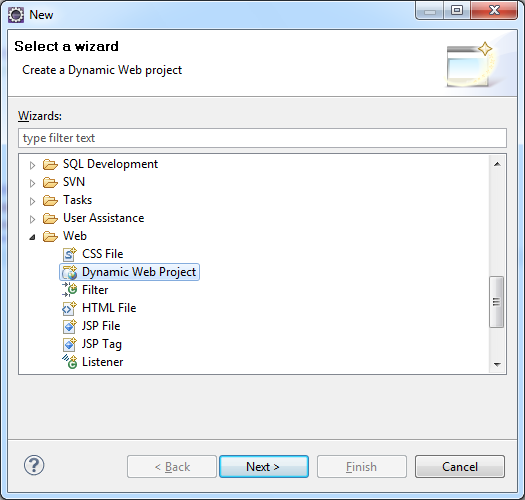
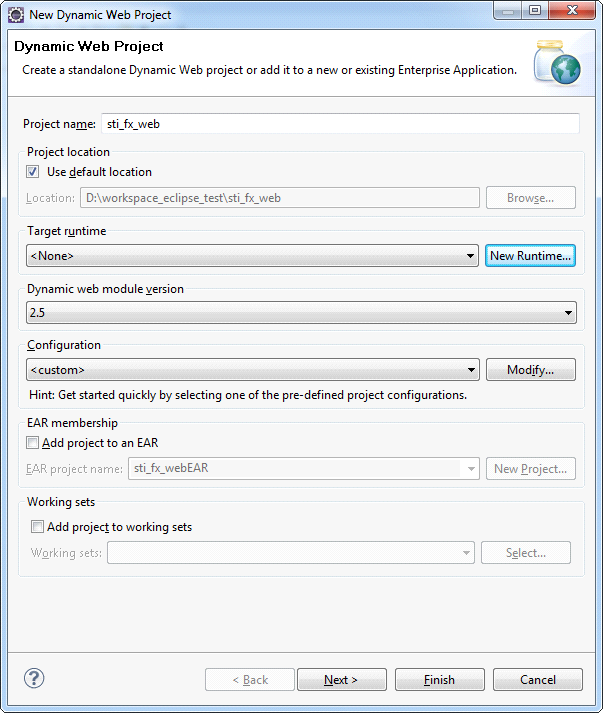
In the window opened fill in the Project name (e.g. sti_fx_web, as shown on Figure 2). Then configure the web server, on which the application will run.
3. How to Target a Runtime?
Under Target Runtime, you see , as shown in the picture below, because you haven't created a runtime yet for Apache Tomcat. Click New Runtime to open the New Target Runtime Wizard. Select Apache Tomcat of the correct version from a list. Check Create a new local server as shown on Figure 3, then click Next.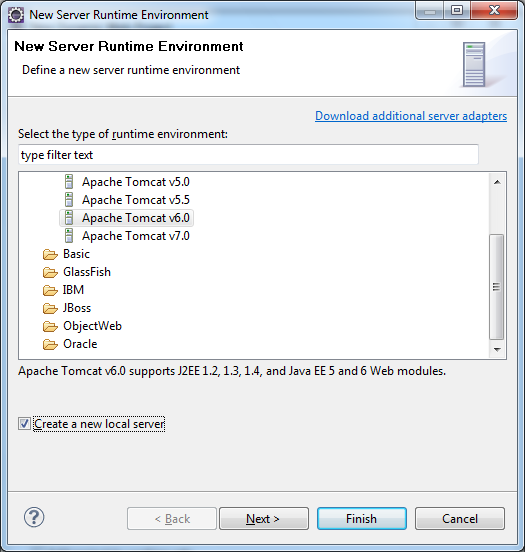
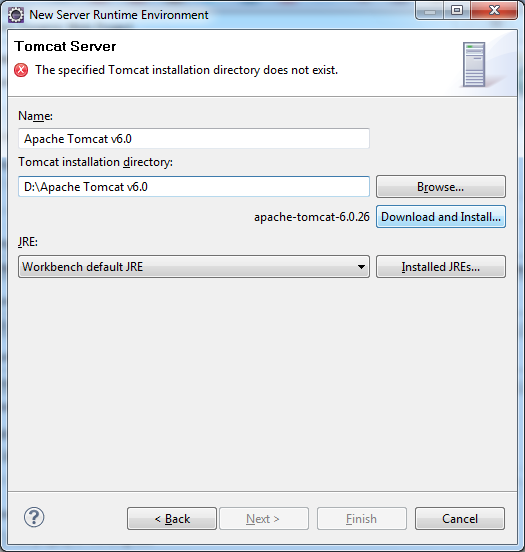
Then define the Tomcat installation directory, in which Apache Tomcat is installed, or in which one needs to install it, as shown on Figure 4. If it is not installed, then click Download and Install. After all fields are specified, click Finish.
4. How Do I Create a Sample Page?
In order to verify the project and the Tomcat server, create a simple JSP and deploy it on Tomcat. To do this, one can create a new JSP, by choosing File> New> Other, or one can use the context menu, right-click the project name in the Project Explorer and select New> JSP file. In the next window (see the picture) define the directory Web Content, and in the File name write index.jsp. Click Finish to create pages using the default template.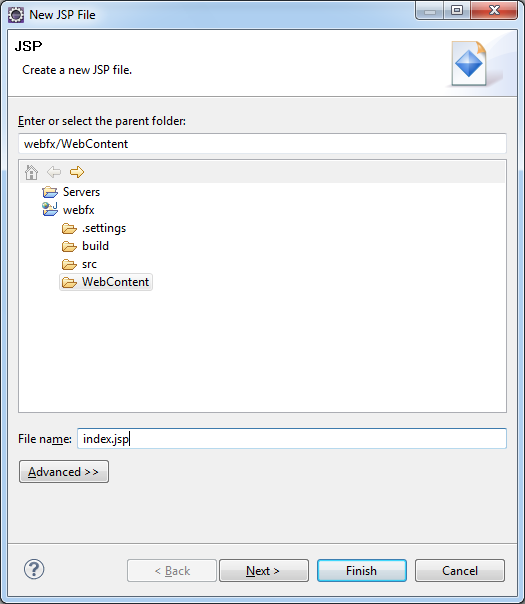
Now open the index.jsp and edit it so that it displays the current date. The code page is specified in the code:
<!DOCTYPEhtmlPUBLIC"-//W3C//DTD HTML 4.01 Transitional//EN">
<%@ page language="java" contentType="text/html; charset=UTF-8" pageEncoding="UTF-8" %>
<html>
<head>
	<meta http-equiv="Content-Type" content="text/html; charset=UTF-8">
	<title>stimulsoft reports</title>
</head>
<body>
	<%java.util.Date date = new java.util.Date();%>
	<h1>
		This index.jsp.<br>
		<%=date.toString()%>
	</h1>
</body>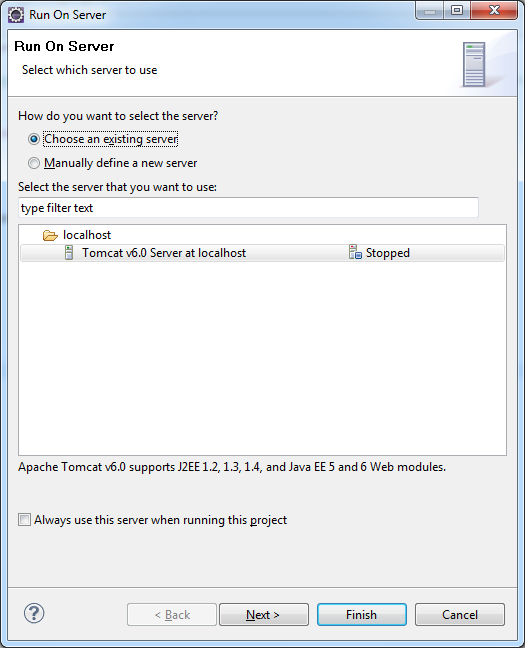
</html>Now deploy it on the server. For this one need to use the context menu, right-click the project name, select Run > Run as > Run on server. Define a previously created server and click Finish.
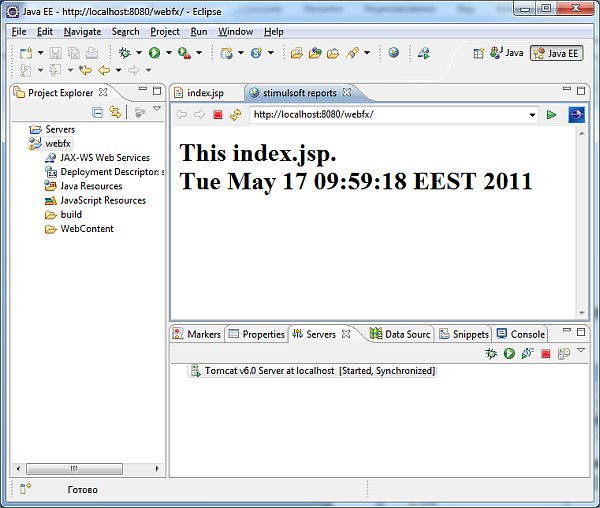
As a result, you receive the following (see the picture below). This page will be available from any browser at http://localhost:8080/{ProjectName}, where the {ProjectName} name of the created project, in our case sti_fx_web.
5. How Do I Create a Sample Page With the Report Designer?
Create a simple page with a report designer. To do this, put the following libraries into the WebContent\WEB-INF\lib\ directory: stimulsoft.lib.jar, stimulsoft.reports-base.jar, stimulsoft.reports-report.jar, stimulsoft.reports-flex.jar, stimulsoft.reports-web.jar. As a result, one can see the following (picture below):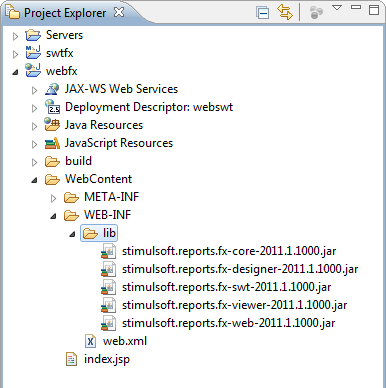
Next, open the web.xml for editing, it should look like in Listing 2:
<?xml version="1.0" encoding="UTF-8" ?>
<web-app xmlns:xsi="http://www.w3.org/2001/XMLSchema-instance"
	xmlns="http://java.sun.com/xml/ns/javaee"
	xmlns:web="http://java.sun.com/xml/ns/javaee/webapp_2_5.xsd"
	xsi:schemaLocation="http://java.sun.com/xml/ns/javaee"
	id="WebApp_ID" version="2.5">
	<display-name>sti_webviewer</display-name>
	<welcome-file-list>
		<welcome-file>index.jsp</welcome-file>
	</welcome-file-list>
	<!-- configuration, this parameter indicates the main application directory -->
	<servlet>
		<servlet-name>StimulsoftResource</servlet-name>
		<servlet-class>com.stimulsoft.web.servlet.StiWebResourceServlet</servlet-class>
	</servlet>
	<servlet-mapping>
		<servlet-name>StimulsoftResource</servlet-name>
		<url-pattern>/stimulsoft_web_resource</url-pattern>
	</servlet-mapping>
	<servlet>
		<servlet-name>StimulsoftAction</servlet-name>
		<servlet-class>com.stimulsoft.webviewer.servlet.StiWebViewerActionServlet</servlet-class>
	</servlet>
	<servlet-mapping>
		<servlet-name>StimulsoftAction</servlet-name>
		<url-pattern>/stimulsoft_webviewer_action</url-pattern>
	</servlet-mapping>
</web-app>Leave unchanged the remaining web.xml blocks, which defines the servlets required for working. Then, edit the index.jsp (see the code below):
<!DOCTYPEhtmlPUBLIC"-//W3C//DTD HTML 4.01 Transitional//EN">
<%@ page language="java" contentType="text/html; charset=UTF-8" pageEncoding="UTF-8" %>
<%@ taglib uri="http://stimulsoft.com/designer" prefix="stidesignerfx" %>
<%@ taglib uri="http://stimulsoft.com/viewer" prefix="stiviewerfx" %>
<html>
<head>
<meta http-equiv="Content-Type" content="text/html; charset=UTF-8">
<title>Stimulsoft Reports.Fx for Java</title>
</head>
<body>
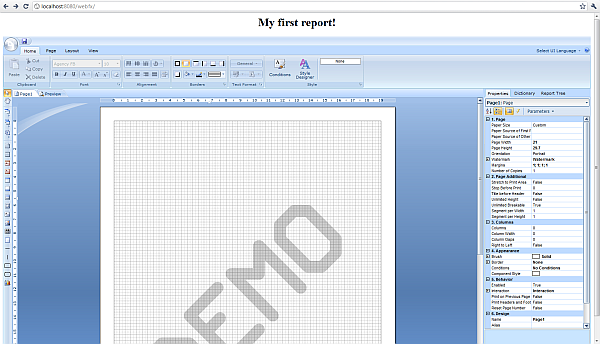
<h1 align="center">My first report!</h1>
<stidesignerfx:iframe
width="100%" height="90%" align="middle"
styleClass="" frameborder="0" styleId=""
marginheight="4" marginwidth="10" name="stiviewer"
scrolling="no" style="" title="report"/>
</body>
</html>Add taglib directives in the JSP (Listing 4). They will work with custom tags on the page.
<%@ taglib uri="http://stimulsoft.com/designer" prefix="stidesignerfx" %>
<%@ taglib uri="http://stimulsoft.com/viewer" prefix="stiviewerfx" %>Add a tag <stidesignerfx:iframe/>, an analog of an html tag iframe with the support of all its attributes. See the following as a result of the application deployment (Figure 9):
6. Do You Have a Description of Custom Tags?
There is a division into two components: DesignerFx and ViewerFx, it can be seen from Listing 5. Consider a DesignerFx component. For a ViewerFx it works the same way.<stidesignerfx:link text="a link for jumping to the Designer"/>
<stidesignerfx:button value="a button for jumping to the Designer"/>
<stidesignerfx:frame title="analog of the html tag frame which contains a Designer"/>
<stidesignerfx:iframe title="analog of the html tag iframe which contains a Designer"/>All these are analogs of similar HTML tags, supporting all the attributes. A list of standard attributes is expanded for displaying the report and setting variables for the report. The report = "SimpleList.mrt" attribute opens the report with the name SimpleList.mrt. Variables in the Report can be passed in two ways:
Set the value of a variableStr attribute as a string in the following format: "Variable1 = value1 & Variable2 = value2". In this case, two variables Variable1 with a value1 and Variable2 with a value2 in the report will be passed. For example, you need to edit the index.jsp file to open a report with the name MyFirstReport.mrt by clicking the button and the MyVar report variable has the stidesignerfx value (Listing 6).
<!DOCTYPEhtmlPUBLIC"-//W3C//DTD HTML 4.01 Transitional//EN">
<%@ page contentType="text/html;charset=UTF-8" import="java.util.*" %>
<%@ taglib uri="http://stimulsoft.com/designer" prefix="stidesignerfx" %>
<%@ taglib uri="http://stimulsoft.com/viewer" prefix="stiviewerfx" %>

<html>
<head>
	<title>Report</title>
	<meta http-equiv="Content-Type" content="text/html; charset=UTF-8" />
</head>
<body>
<stidesignerfx:button value="Run the report designer" report="MyFirstReport.mrt" variableStr="MyVar=stidesignerfx" />
</html>It is also possible to pass parameters to a report as a Map <string, string=>. Redesign our webpage as follows (Listing 6). In this case, a report with the name MyFirstReport.mrt will be loaded in a report and two parameters will be passed into it.
<!DOCTYPEhtmlPUBLIC"-//W3C//DTD HTML 4.01 Transitional//EN">
<%@ page contentType="text/html;charset=UTF-8" import="java.util.*" %>
<%@ taglib uri="http://stimulsoft.com/designer" prefix="stidesignerfx" %>
<%@ taglib uri="http://stimulsoft.com/viewer" prefix="stiviewerfx" %>

<html>
<head>
	<title>Report</title>
	<meta http-equiv="Content-Type" content="text/html; charset=UTF-8" />
</head>
<body>
<%
	Map<String, String>variableMap= new HashMap<String, String>();
	variableMap.put("Variable1", "var1");
	variableMap.put("Variable2", "var2");
	request.setAttribute("myMap", variableMap);
%>
<stidesignerfx:iframe report="MyFirstReport.mrt" variableMap="myMap"
	width="100%" height="100%" align="right"
	styleClass="" frameborder="0" styleId=""
	marginheight="1" marginwidth="1" name="stidesignerfx"
	scrolling="no" style="" title="report" />
</body>
</html>Data here are passed as a HashMap, this parameter should be set to the request or session, and the key under which it will be there should be passed to the tag as a variableMap attribute. Applying two attributes variableMap and variableStr is not allowed.
7. How do I Override Methods for Loading, Saving and Loading Custom Data?
Before running, the application should be configured. For configuration the my.servlet.ApplicationInitializer class that is specified in the web.xml is used.package my.servlet;
import java.io.IOException;
import java.util.Properties;
import javax.servlet.ServletContextEvent;
import javax.servlet.ServletContextListener;
import my.actions.MyLoadAction;
import my.actions.MyLoadDataAction;
import my.actions.MyLocalizationAction;
import my.actions.MyMailAction;
import my.actions.MyRenderReportAction;
import my.actions.MySaveAction;
import com.stimulsoft.base.exception.StiException;
import com.stimulsoft.flex.StiFlexConfig;
/**
* Application initialization.
*/
public class ApplicationInitializer implements ServletContextListener {
@Override
public void contextInitialized(final ServletContextEvent event) {
try {
// configuration application
StiFlexConfig stiConfig = initConfigWithoutDir();
// ---------------------------------------------------------
// need to override the standard methods
// another comment
stiConfig.setLoadClass(MyLoadAction.class);
stiConfig.setSaveClass(MySaveAction.class);
stiConfig.setLoadDataClass(MyLoadDataAction.class);
stiConfig.setMailAction(MyMailAction.class);
stiConfig.setLocalizationAction(MyLocalizationAction.class);
stiConfig.setRenderReportAction(MyRenderReportAction.class);
// ---------------------------------------------------------
StiFlexConfig.init(stiConfig);
// set variable in servlet context attribute
// Map<String, String> myVariableMap = new HashMap<String, String>();
// myVariableMap.put("Variable1", "myVariableMap");
// event.getServletContext().setAttribute("myMap", myVariableMap);
} catch (Exception e) {
throw new RuntimeException(e);
}
}
@Override
public void contextDestroyed(final ServletContextEvent event) {
// empty
}
public StiFlexConfig initConfigWithoutDir() throws StiException, IOException {
Properties properties = new Properties();
// load your own Properties;
// InputStream inStream = getClass().getResourceAsStream("RESOURCE_PATH");
// properties.load(inStream);
return new StiFlexConfig(properties);
}
}In which the main application directory with the file stimulsoft.properties will be defined. In order to make your own reports saving or loading, it is necessary to specify these classes in a configuration, just the same way as you can specify a class to load data from xml. Classes are as follow: Listing MyLoadAction.java
package my.actions;

import java.io.InputStream;

import com.stimulsoft.actions.LoadAction;
import com.stimulsoft.library.LoadFileReport;

public class MyLoadAction extends LoadAction {
	@Override
	public InputStream load(String repotrName) {
		System.out.println("my load class" + repotrName);
		return new LoadFileReport().getReport(repotrName);
	}
}package my.actions;
import com.stimulsoft.flex.StiSaveAction;
import com.stimulsoft.flex.utils.StiOperationResult;
import com.stimulsoft.flex.utils.StiSaveLoadFileReport;
public class MySaveAction extends StiSaveAction {
@Override
public StiOperationResult save(String report, String reportName, boolean newReportFlag) {
System.out.println("must override this method to specify your own save report");
return new StiSaveLoadFileReport().save(report, reportName, newReportFlag);
}
}package my.actions;
import java.sql.Connection;
import java.sql.DriverManager;
import java.sql.SQLException;
import java.util.Properties;
import com.stimulsoft.flex.StiLoadDataAction;
public class MyLoadDataAction extends StiLoadDataAction {
@Override
protected String getConnectionString() {
System.out.println("must override this method to specify your own connection string");
// return
// "Data Source=localhost\\SQLEXPRESS;Initial Catalog=Mybase;User ID=UserName; Password=Password;";
return super.getConnectionString();
}
@Override
protected String getUserName() {
System.out.println("must override this method to specify your own user name");
// return "UserName";
return super.getUserName();
}
@Override
protected String getPassword() {
System.out.println("must override this method to specify your own password");
// return "Password";
return super.getPassword();
}
@Override
protected String getQuery() {
System.out.println("my Query " + super.getQuery());
return super.getQuery();
}
@Override
public Connection getConnection() throws ClassNotFoundException, SQLException {
System.out.println("must override this method to specify your own connection");
boolean overrideByConnectionString = getConnectionString() != null
&& getConnectionString().equals("needOverride");
boolean overrideByDataSource = getDataSourceName() != null
&& getDataSourceName().equals("DataSourceOverride");
if (overrideByConnectionString || overrideByDataSource) {
Class.forName("com.microsoft.sqlserver.jdbc.SQLServerDriver");
Properties info = new Properties();
info.setProperty("user", "test");
info.setProperty("password", "test");
String connectionString = "jdbc:sqlserver://localhost\\SQLEXPRESS1:1433;databaseName=mybase;";
return DriverManager.getConnection(connectionString, info);
} else {
return super.getConnection();
}
}
}8. How to Use SWT (Standard Widget Toolkit) Components?
Create a new java project. To do this, select File > New > Java Project. In the project wizard enter the name of the project, for example "swtfx". In the project properties add a relation to the "Standard Widget Toolkit (SWT)" library for designing the application GUI. Also add libraries for working with reports: stimulsoft.reports.fx-core-2011.1.1000.jarstimulsoft.reports.fx-designer-2011.1.1000.jar, stimulsoft.reports.fx-viewer-2011.1.1000.jar, stimulsoft.reports.fx-swt-2011.1.1000.jar.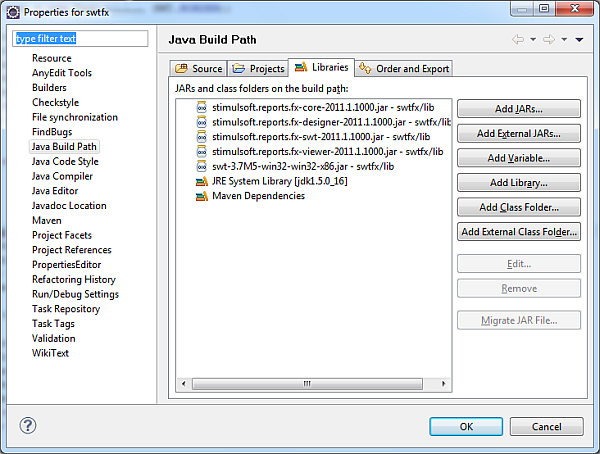
Then create a new class with the package my.swt and a Reports name.
package my.swt;

import java.io.File;

import org.eclipse.swt.SWT;
import org.eclipse.swt.layout.GridData;
import org.eclipse.swt.layout.GridLayout;
import org.eclipse.swt.widgets.Display;
import org.eclipse.swt.widgets.Label;
import org.eclipse.swt.widgets.Shell;

import com.stimulsoft.StiConfig;
import com.stimulsoft.StiReportSwt;
import com.stimulsoft.library.StiException;
import com.stimulsoft.widgets.DesignerFx;

public class Reports {
	public static void main(String[] args) {
		initReport();
		Display display = new Display();
		Shell shell = new Shell(display);
		GridLayoutgridLayout = newGridLayout();
		gridLayout.marginHeight=0;
		gridLayout.marginWidth=0;

		shell.setLayout(gridLayout);
		shell.setText("My report");
		try {
			DesignerFx designer = new DesignerFx(shell, SWT.NO);
			GridDatagridData = new GridData(GridData.FILL_BOTH);
			designer.getComposite().setLayoutData(gridData);
		} catch (StiException e) {
			e.printStackTrace();
			Label label = new Label(shell, SWT.NONE);
			label.setLayoutData(newGridData(SWT.BEGINNING, SWT.CENTER, false, false));
			label.setText("failed to create reports designer");
		}
		shell.setMaximized(true);
		shell.open();

		while (!shell.isDisposed()) {
			if (!display.readAndDispatch()) {
				display.sleep();
			}
		}
		display.dispose();
	}

	Private static void initReport() {
		try {
			File stiDir = new File("D:/stimulsoft");
			StiConfig stiConfig = new StiConfig(stiDir);
			StiReportSwt.init(stiConfig);
		} catch (StiException e) {
			e.printStackTrace();
		}
	}

}It is possible to distribute and modify the report and options by the event. To do this, change the code in Reports.java the following way.
package my.swt;
import java.io.File;
import java.util.HashMap;
import java.util.Map;
import org.eclipse.swt.SWT;
import org.eclipse.swt.events.SelectionEvent;
import org.eclipse.swt.events.SelectionListener;
import org.eclipse.swt.layout.GridData;
import org.eclipse.swt.layout.GridLayout;
import org.eclipse.swt.widgets.Button;
import org.eclipse.swt.widgets.Display;
import org.eclipse.swt.widgets.Shell;
import com.stimulsoft.StiConfig;
import com.stimulsoft.StiReportSwt;
import com.stimulsoft.library.StiException;
import com.stimulsoft.widgets.ViewerFx;
public class Reports {
Display display = new Display();
Shell shell = new Shell(display);
private final ViewerFx viewer;
public Reports() throws StiException {
shell.setLayout(new GridLayout(2, false));
Map<String, String> params = new HashMap<String, String>();
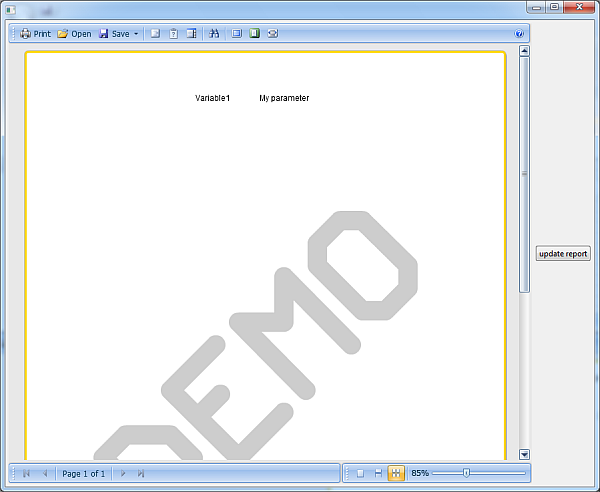
params.put("Variable1", "My parameter");
viewer = new ViewerFx(shell, SWT.NO, "SimpleList.mrt", params);
GridDatagridData = new GridData(GridData.FILL_BOTH);
viewer.getComposite().setLayoutData(gridData);
Button button = new Button(shell, SWT.PUSH);
button.setLayoutData(new GridData(SWT.BEGINNING, SWT.CENTER, false, false));
button.setText("update report");
button.addSelectionListener(new SelectionListener() {
public void widgetSelected(SelectionEvent arg0) {
try {
Map<String, String>paramsNew = new HashMap<String,String>();
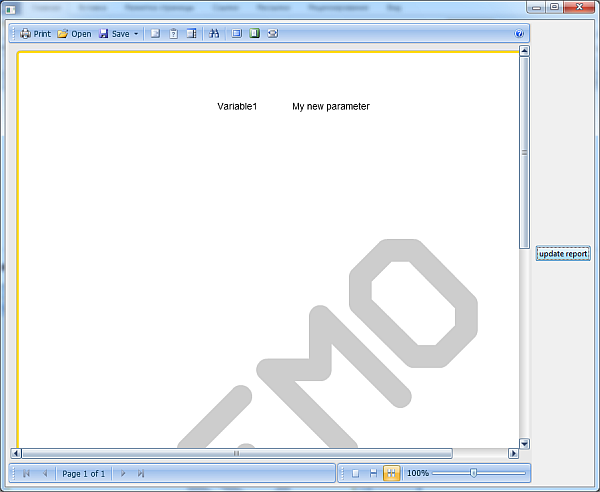
paramsNew.put("Variable1", "My new parameter");
viewer.assignReport("SimpleList.mrt", paramsNew);
} catch (Exception e) {
e.printStackTrace();
}
}
public void widgetDefaultSelected(SelectionEvent arg0) {
}
});
shell.setMaximized(true);
shell.open();
while (!shell.isDisposed()) {
if (!display.readAndDispatch()) {
display.sleep();
}
}
display.dispose();
}
public static void main(String[] args) {
try {
initReport();
new Reports();
} catch (StiException e) {
e.printStackTrace();
}
}
private static void initReport() throws StiException {
StiConfigstiConfig = new StiConfig(new File("D:/stimulsoft"));
StiReportSwt.init(stiConfig);
}
}This will result in the following:
After clicking the update report button, the report will be updated:
When using components for rendering reports one should configure the application before running this application. The following method should be created.
private static void initReport() throws StiException {
	File stiDir = new File("D:/Stimulsoft");
	new Resource().copyAll(stiDir);
	StiSwtConfig stiConfig = new StiSwtConfig(stiDir);
	StiReportSwt.init(stiConfig);
}In which the main application directory with the stimulsoft.properties file will be defined. Initialization is identical to that described for the web application. It is also possible to override ports of the application for the designer and viewer. For example:
private static void initReport() throws StiException {
	// Initialization is identical to that described for the web application
	File stiDir = new File("D:/Stimulsoft");
	new Resource().copyAll(stiDir);
	StiSwtConfig stiConfig = new StiSwtConfig(stiDir);

	// ---------------------------------------------------------
	// need to override the standard methods
	// another comment
	stiConfig.setLoadClass(MyLoadAction.class).setSaveClass(MySaveAction.class);
	stiConfig.setXMLDataClass(MyXMLDataAction.class).setLoadDataClass(MyLoadDataAction.class);
	stiConfig.setViewerPort(7845).setDesignerPort(8789);
	// ---------------------------------------------------------

	StiReportSwt.init(stiConfig);
}It is also possible to use the designer and viewer component as a dialog box. Classes of components:
com.stimulsoft.widgets.DesignerFxDialog
com.stimulsoft.widgets.ViewerFxDialog
An example of using the Designer component:
package my.swt;

import java.io.File;

import org.eclipse.swt.SWT;
import org.eclipse.swt.events.SelectionEvent;
import org.eclipse.swt.events.SelectionListener;
import org.eclipse.swt.layout.GridLayout;
import org.eclipse.swt.widgets.Button;
import org.eclipse.swt.widgets.Display;
import org.eclipse.swt.widgets.Shell;

import com.stimulsoft.StiConfig;
import com.stimulsoft.StiReportSwt;
import com.stimulsoft.library.StiException;
import com.stimulsoft.widgets.DesignerFxDialog;

public class DialogReports {
	public static void main(String[] args) {
		try {
			initReport();
			Display display = new Display();
			Shell shell = new Shell(display);
			shell.setLayout(new GridLayout());
			final DesignerFxDialog dialog = new DesignerFxDialog(shell,
				SWT.RESIZE | SWT.DIALOG_TRIM | SWT.APPLICATION_MODAL);
			dialog.setSize(1250, 800);
			Button button = new Button(shell, SWT.PUSH);
			button.setText("open dialog");
			button.addSelectionListener(new SelectionListener() {
				public void widgetSelected(SelectionEvent arg0) {
					try {
						dialog.open("SimpleList.mrt");
					} catch (StiException e) {
					}
				}

				public void widgetDefaultSelected(SelectionEvent arg0) {
				}
			});
			shell.pack();
			shell.open();

			while (!shell.isDisposed()) {
				if (!display.readAndDispatch()) {
					display.sleep();
				}
			}
			display.dispose();
		} catch (StiException e) {
			e.printStackTrace();
		}
	}

	private static void initReport() throws StiException {
		File stiDir = new File("D:/stimulsoft");
		StiConfig stiConfig = new StiConfig(stiDir);
		StiReportSwt.init(stiConfig);
	}
}