Stimulsoft reporting provides built in components that allow the developer to programmatically export their reports to a wide variety of document formats. In my experience the user requirement is usually to have an export button on the webpage or a windows forms that does the job for the user. Exporting by code behind is also usually required for batch processes where reports scheduled to be emailed to users or saved to a network drive or they may also be uploaded to sharepoint/ftp server. Below is the list of formats that we support natively by Stimulsoft reporting. There is no need to use third party or COM components.
In this tutorial I will show to create a simple table report, show it on a web page and show an Export to PDF button on a webpage that allows the user to download the PDF. For doing that I need a way to call the export function of the report or report viewer in the code behind.
The demo version of Stimulsoft reporting tools can be downloaded from the website: http://www.stimulsoft.com/en/downloads
The following steps are required in order to create a cross-tab report and export it to PDF, Word, Excel and other formats.
1. Supported Export Formats
2. Supported Export Settings
3. Add report to your web page
4. Add a new connection to the report
5. Add a Data Source to the report
6. Add Table and Page Header to the report
7. Add report to your web page
8. Page load event
9. Export Report on Export button click
1. Supported Export Formats
2. Supported Export Settings
Stimulsoft Reports has built-in support for exporting to a file on the disk using the ExportDocument function of the StiReport object. The reporting framework also has the StiReportResponse class for exporting the report directly to the http response so users can download reports as files in a web application. When exporting to the http response it also provides export options listed below.
1) openDialog flag:
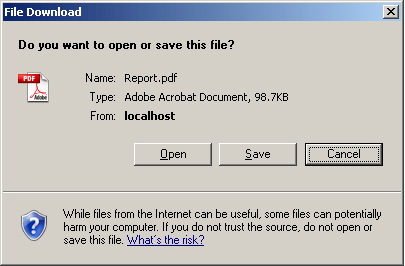
If this flag is set to true, it will force the user to download the file before opening and if the flag is set to false, it will allow the browse to open the application required to show the report. For example, if the export format is PDF and the show dialog flag is set to false, the browser will open Adobe Reader in the browse if it installed on the client computer and if the show dialog flag is set to true, the browser will prompt the user to download the report as file even if Adobe Reader viewer is installed on the client computer.
Example:

In the screen shot below openDialog is set to true, so use is asked to Open, Save or Cancel depending on the browser.
2) StiPagesRanges
If the programmer wants to define which pages of the report should be exported, they have the option of passing an object of the StiPagesRange class as a parameter to the export function. With the stiPagesRange programmers can export only one page or give page ranges to be exported.
Example:
This parameter allows the programmer to set advanced export settings listed below;
a) Compression flag – Enable/Disable compression of the PDF;
b) Creator string – Set the name of the creator;
c) Image Quality – Sets the image quality;
d) Image Resolution – Sets the image resolution;
e) Allow embedded fonts – Allow embedded fonts in the PDF;
f) Keywords – Keywords;
g) Password – Pdf security password;
h) Digital Certificates – Enable/Disable local digital signatures and certificates;
i) Page Range – Page range to be exported.
4) StiExcelExportSettings
This parameter can be used when exporting reports to Excel. The following advanced properties can be set;
a) ExportDataOnly – Export only data without formatting and images;
b) ExportEachPageToSheet – Export each report page to a new excel worksheet;
c) ExportObjectFormatting – Export the formatting for text, pictures and other objects;
d) ExportPageBreaks – Export page breaks for printing of sheets;
e) ImageQuality – Sets the image quality;
f) ImageResolution – Sets the image resolution;
g) PageRange – Page range to be exported;
h) UseOnePageHeaderAndFooter – Use only one page header and footer for the entire sheet;
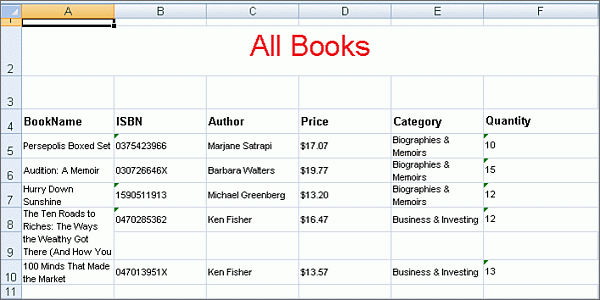
In the screenshot below, Export Data only is set to false.
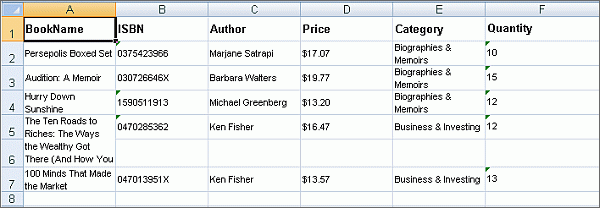
Export Data only is set to true
3. Add report to your web page
4. Add a new connection to the report
5. Add a Data Source to the report
6. Add Table and Page Header to the report
7. Add report to your web page
8. Page load event
In this tutorial I will show to create a simple table report, show it on a web page and show an Export to PDF button on a webpage that allows the user to download the PDF. For doing that I need a way to call the export function of the report or report viewer in the code behind.
The demo version of Stimulsoft reporting tools can be downloaded from the website: http://www.stimulsoft.com/en/downloads
The following steps are required in order to create a cross-tab report and export it to PDF, Word, Excel and other formats.
1. Supported Export Formats
2. Supported Export Settings
3. Add report to your web page
4. Add a new connection to the report
5. Add a Data Source to the report
6. Add Table and Page Header to the report
7. Add report to your web page
8. Page load event
9. Export Report on Export button click
1. Supported Export Formats
- PDF (Adobe Portable Document Format);
- Microsoft XPS (XML Paper Specification);
- HTML (HyperText Markup Language);
- MHT;
- Text;
- Rich Text;
- Microsoft Word 2007;
- OpenDocument Writer;
- Microsoft Excel;
- Microsoft Excel XML;
- OpenDocument Calc;
- CSV (Comma-separated values);
- dBase DBF (DataBase File);
- XML (Extensible Markup Language);
- BMP (Bitmap);
- GIF (Graphics Interchange Format);
- JPEG (Joint Photographic Experts Group);
- PCX (Pacific Exchange);
- PNG (Portable Network Graphics);
- TIFF (Tagged Image File Format);
- Windows Metafile.
2. Supported Export Settings
Stimulsoft Reports has built-in support for exporting to a file on the disk using the ExportDocument function of the StiReport object. The reporting framework also has the StiReportResponse class for exporting the report directly to the http response so users can download reports as files in a web application. When exporting to the http response it also provides export options listed below.
1) openDialog flag:
If this flag is set to true, it will force the user to download the file before opening and if the flag is set to false, it will allow the browse to open the application required to show the report. For example, if the export format is PDF and the show dialog flag is set to false, the browser will open Adobe Reader in the browse if it installed on the client computer and if the show dialog flag is set to true, the browser will prompt the user to download the report as file even if Adobe Reader viewer is installed on the client computer.
Example:
//set the StiReport report object
StiReport oSR = stiBooksReport.GetReport();
// Export report to pdf and force user to download the file
StiReportResponse.ResponseAsPdf(this, oSR, false);
// Export report to pdf and open Adobe Reader if available
StiReportResponse.ResponseAsPdf(this, oSR);
In the screen shot below openDialog is set to true, so use is asked to Open, Save or Cancel depending on the browser.
2) StiPagesRanges
If the programmer wants to define which pages of the report should be exported, they have the option of passing an object of the StiPagesRange class as a parameter to the export function. With the stiPagesRange programmers can export only one page or give page ranges to be exported.
Example:
//set the StiReport report object
StiReport oSR = stiBooksReport.GetReport();
// Export page 1
StiPagesRange oSPR = new StiPagesRange(1);
// Export report to pdf and open the file in browser
StiReportResponse.ResponseAsPdf(this, oSR, false, oSPR);

//set the StiReport report object
StiReport oSR = stiBooksReport.GetReport();
// Export pages 1 to 10
StiPagesRange oSPR = new StiPagesRange("1-10");
// Export report to pdf and open the file in browser
StiReportResponse.ResponseAsPdf(this, oSR, false, oSPR);This parameter allows the programmer to set advanced export settings listed below;
a) Compression flag – Enable/Disable compression of the PDF;
b) Creator string – Set the name of the creator;
c) Image Quality – Sets the image quality;
d) Image Resolution – Sets the image resolution;
e) Allow embedded fonts – Allow embedded fonts in the PDF;
f) Keywords – Keywords;
g) Password – Pdf security password;
h) Digital Certificates – Enable/Disable local digital signatures and certificates;
i) Page Range – Page range to be exported.
4) StiExcelExportSettings
This parameter can be used when exporting reports to Excel. The following advanced properties can be set;
a) ExportDataOnly – Export only data without formatting and images;
b) ExportEachPageToSheet – Export each report page to a new excel worksheet;
c) ExportObjectFormatting – Export the formatting for text, pictures and other objects;
d) ExportPageBreaks – Export page breaks for printing of sheets;
e) ImageQuality – Sets the image quality;
f) ImageResolution – Sets the image resolution;
g) PageRange – Page range to be exported;
h) UseOnePageHeaderAndFooter – Use only one page header and footer for the entire sheet;
In the screenshot below, Export Data only is set to false.
Export Data only is set to true
3. Add report to your web page
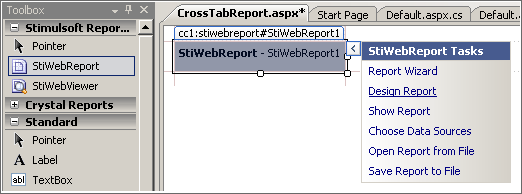
- Drag and Drop StiWebReport from the toolbox to your webpage;
- Click on the arrow on the top right corner of StiWebReport1 to show StiWebReport Tasks;
- Click on Design Report to open the report Designer.
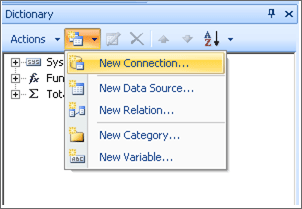
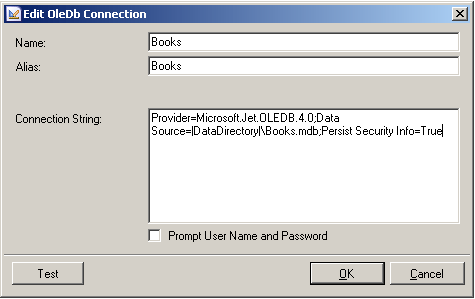
4. Add a new connection to the report
- Find the Dictionary on the right side of the report designer;
- Click on the New Item Icon and select New Connection;
- Select SQL Connection and click OK;
- Type the connection string for the MS Access Books database;
- Click test to confirm that the connection string is correct.
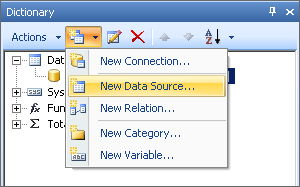
5. Add a Data Source to the report
- Click on the New Item icon the Dictionary pane and select New Data Source;
- Select Data from SQL Connection and Click Ok;
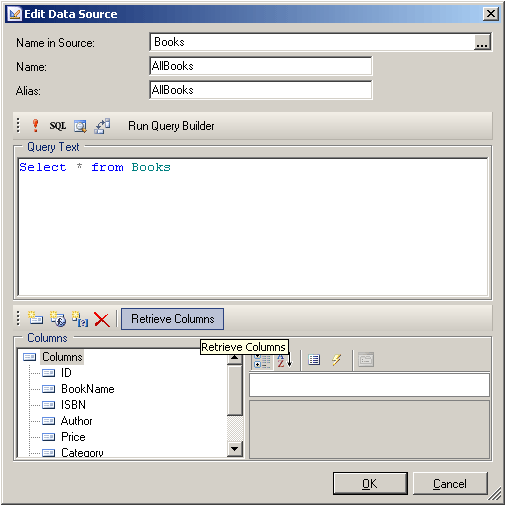
- Type the name of the query in the Name field as Sales;
- Type the SQL query in the Query Text Field;
- Click on Retrieve Columns to confirm that you have all the required columns;
- Click Ok to see the Sales Datasource in the Dictionary Pane;
- The following query has been used in the report;
- Give a name to the data source so that it can used later.
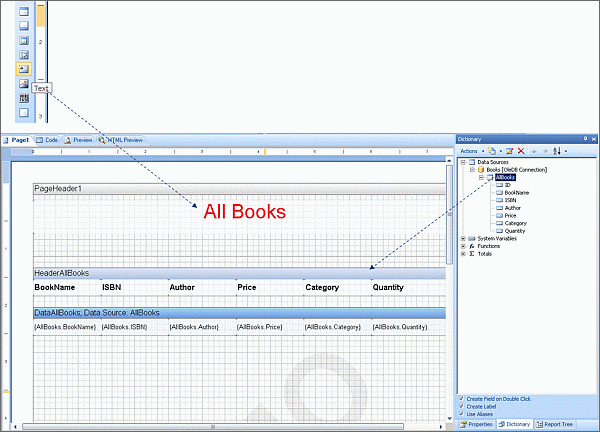
Select * from Books6. Add Table and Page Header to the report
- Click on the AllBooks data source and drag it to the report;
- Click on the Text tool on the toolbar and click on the Page Header to insert a label;
- Format label to your requirements, this label will shown as the page header for each report.
7. Add report to your web page
- Design the report using the Report Designer and save the report file to a know location;
- Drag and Drop StiWebReport from the toolbox to your webpage;
- Click on the arrow on the top right corner of StiWebReport1 to show StiWebReport Tasks;
- Click on Open Report from File;
- Browse to the report file and click Open; the report is now loaded as a string in the aspx markup itself;
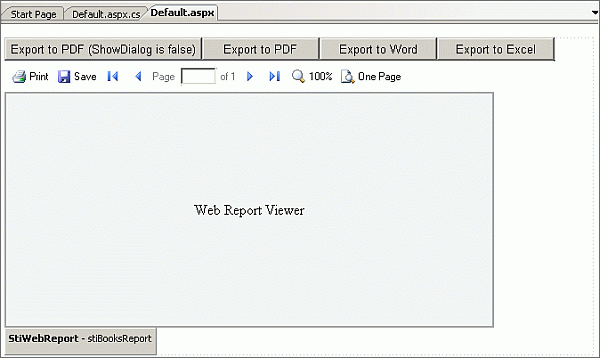
- Add buttons for Export to PDF (ShowDialog is false), Export to PDF, Export to Word and Export to Excel.
8. Page load event
- Get the report object from StiWebReport and set the report viewer source on page load event;
- Assign report to the StiWebViewer to render and show the report.
protected void Page_Load(object sender, EventArgs e)
{
	// ignore the page request if images are beign loaded for report viewer
	if (stiRepViewerBooks.IsImageRequest) return;
	if (!IsPostBack)
	{
		//set the StiReport report object when page loads for the first time
		stiRepViewerBooks.Report = stiBooksReport.GetReport();
	}
}- Set the event handler for each export button to btnExport_Click;
- Call StiReportResponse export functions based the sender object;
- Export can be done by pressing one of the export buttons and the customer can see save dialog or not. It depends on ShowDialog parameter of the ResponseAsPdf method.
protected void btnExport_Click(object sender, EventArgs e)
{
	StiReport oSR = stiBooksReport.GetReport(); //set the StiReport report object
	oSR.Render(false);

	if (sender == btnExportPdfShowDialogIsfalse)
		StiReportResponse.ResponseAsPdf(this, oSR, false); // Export report as PDF with showDialog false
	if (sender == btnExportPdf)
		StiReportResponse.ResponseAsPdf(this, oSR); // Export report as PDF with showDialog true
	if (sender == btnExportWord)
		StiReportResponse.ResponseAsRtf(this, oSR); // Export report as a Word document
	if (sender == btnExportExcel)
		StiReportResponse.ResponseAsXls(this, oSR); // Export report as an Excel Sheet
}