Server Controller
The server controller can control Stimulsoft Server. This utility is installed with the server and folded into a tray on the taskbar. With this utility, you can delete, stop, start, and restart the report server, change the database used by the server, check for server issues. All commands to control the server are separated into tabs: Service, Storage, SMTP, Check. Consider these tabs in more detail.
On the Service tab, you can find the server controls.
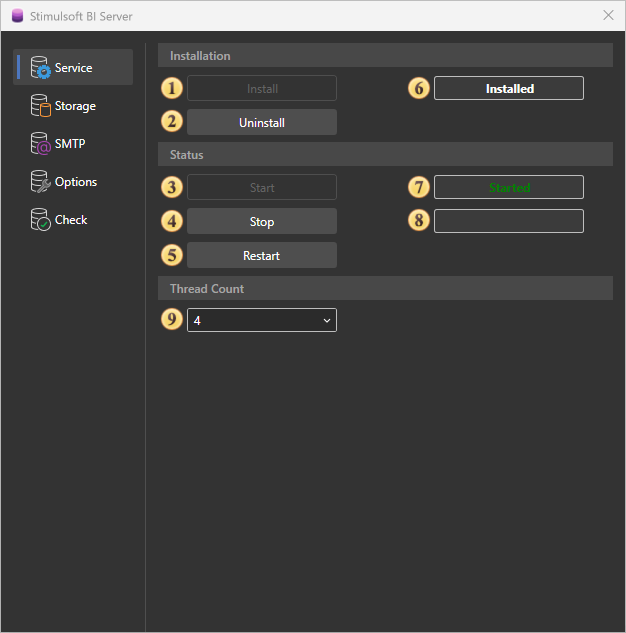
![]() The install button of Stimulsoft Server. The button is disabled when the server is installed.
The install button of Stimulsoft Server. The button is disabled when the server is installed.
![]() The uninstall button of Stimulsoft Server. Uninstalls the report server.
The uninstall button of Stimulsoft Server. Uninstalls the report server.
![]() The Start button runs the report server.
The Start button runs the report server.
![]() The Stop button stops the report server.
The Stop button stops the report server.
![]() The Restart button the report server.
The Restart button the report server.
![]() The field shows the current state of the server.
The field shows the current state of the server.
![]() This field displays the status of the running server. If the server is stopped, this field is blank.
This field displays the status of the running server. If the server is stopped, this field is blank.
![]() This field displays the status when the server is stopped. If the server is running, this field is blank.
This field displays the status when the server is stopped. If the server is running, this field is blank.
![]() In the Thread Count group, you can specify the number of server threads.
In the Thread Count group, you can specify the number of server threads.
Stimulsoft Server can be run only on the following types of databases - MySQL, MS SQL, SQL CE.
Information |
It is important to understand that the server saves its structure in these databases MySQL, MS SQL, SQL CE.
|
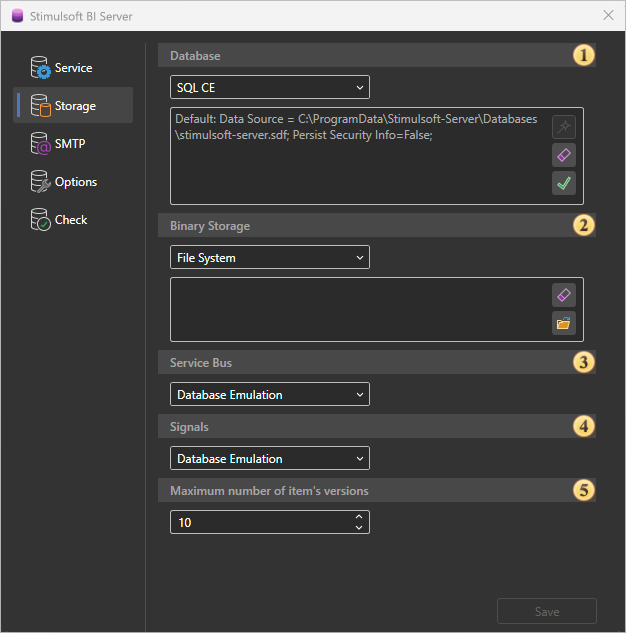
![]() The Database field specifies the database for Stimulsoft Server.
The Database field specifies the database for Stimulsoft Server.
![]() The Binary Storage field specifies storage for server items.
The Binary Storage field specifies storage for server items.
![]() The Service Bus field specifies the storage of server tasks.
The Service Bus field specifies the storage of server tasks.
![]() The Signals field specifies the storage of server signals.
The Signals field specifies the storage of server signals.
![]() The Maximum number of item versions field specifies the number of versions of an item.
The Maximum number of item versions field specifies the number of versions of an item.
For sending emails, you need to use an SMTP server.
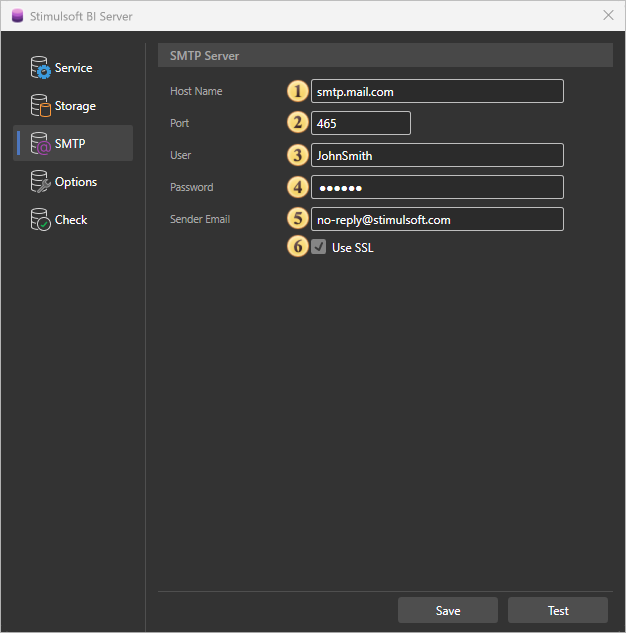
![]() The field SMTP Host. Here you specify the address of the SMTP server.
The field SMTP Host. Here you specify the address of the SMTP server.
![]() The field SMTP Port. Here you specify the port of connection to the server.
The field SMTP Port. Here you specify the port of connection to the server.
![]() The field User. The username (login) to connect to the SMTP server is specified in this field.
The field User. The username (login) to connect to the SMTP server is specified in this field.
![]() The field Password. In this field, the password is specified to authentication on the SMTP server.
The field Password. In this field, the password is specified to authentication on the SMTP server.
![]() The field Sender Email. Specifies the e-mail address that will appear to the recipient as a sender email.
The field Sender Email. Specifies the e-mail address that will appear to the recipient as a sender email.
![]() Use SSL. This option provides the ability to apply a cryptographic cipher to e-mails. If this box is enabled, the cipher is applied.
Use SSL. This option provides the ability to apply a cryptographic cipher to e-mails. If this box is enabled, the cipher is applied.
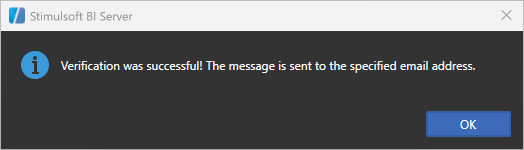
After entering the smtp server settings, you must click the Save button. Also, on this tab there is a Test button to check the smtp server settings. When clicked, a test letter will be sent to the specified address.
Information |
If, after saving the SMTP server settings, the test letter is not delivered to the specified email address, you should run the restart command on the server. To do this, click the Restart button on the Service tab in the server controller.
|
This tab is where you configure the settings.
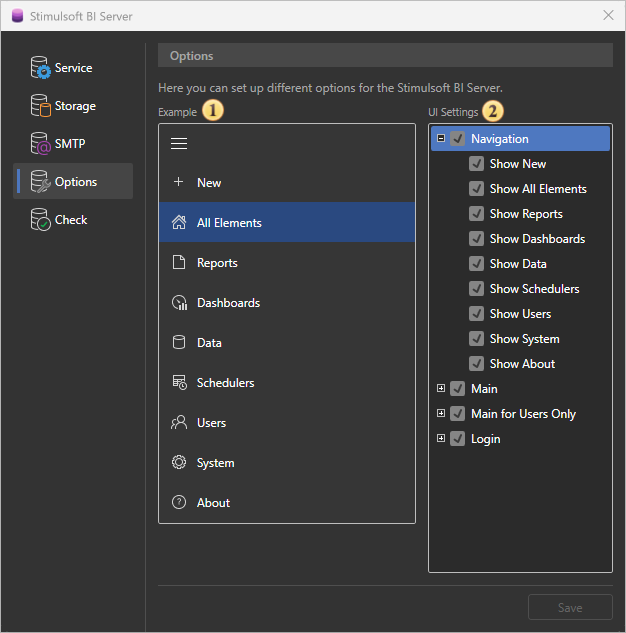
![]() Example of User Interface Display
Example of User Interface Display
![]() User Interface Configuration. Here you can enable or disable the visibility of various sections and features for users.
User Interface Configuration. Here you can enable or disable the visibility of various sections and features for users.
In the Navigation section, you can configure the display of:In the Navigation section, you can configure the display of:
![]() Show New. Displays the option to create new elements
Show New. Displays the option to create new elements
![]() Show All Elements. Displays the "All Elements" item
Show All Elements. Displays the "All Elements" item
![]() Show Reports. Displays the "Reports" item
Show Reports. Displays the "Reports" item
![]() Show Dashboards. Displays the "Dashboards" item
Show Dashboards. Displays the "Dashboards" item
![]() Show Data. Displays the "Data" item
Show Data. Displays the "Data" item
![]() Show Schedulers. Displays the "Schedulers" item
Show Schedulers. Displays the "Schedulers" item
![]() Show Users. Displays the "Users" item
Show Users. Displays the "Users" item
![]() Show System. Displays the "System" item
Show System. Displays the "System" item
![]() Show About. Displays the "About" item
Show About. Displays the "About" item
In the Main section, you can configure the display of:
![]() Show More. Displays the More button
Show More. Displays the More button
![]() Show Versions. Displays the Versions button
Show Versions. Displays the Versions button
![]() Show Using. Displays Using
Show Using. Displays Using
![]() Show Access Key. Displays the Access Key button
Show Access Key. Displays the Access Key button
![]() Show Upload. Displays the Upload button
Show Upload. Displays the Upload button
![]() Show Download. Displays the Download button
Show Download. Displays the Download button
In the Main for Users Only section, you can configure the visibility of the Main section only for regular users (without administrative rights).
In the Login section, you can configure:
![]() Show Sign Up. Displays the Sign Up button
Show Sign Up. Displays the Sign Up button
On this tab, you can check for errors, warnings, and information messages in the server.
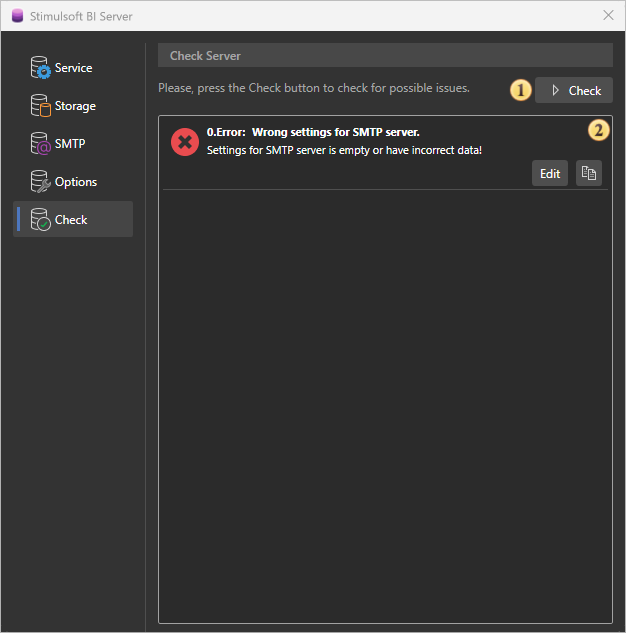
![]() The button to start the test of the report server on errors, warnings, and information messages.
The button to start the test of the report server on errors, warnings, and information messages.
![]() The panel displays a general list of messages and alerts.
The panel displays a general list of messages and alerts.